Recently I had a bit of a play around with an old SCSI QIC tape drive at the same time I also bought a few older older drives too. It seems that almost every QIC tape drive (regardless of brand?) has a common issue that the material used to make capstan breaks down over many decades, turning into some kind of mess.
What were the original capstans made of?

I sure would like to know. The newest drive I bought (Wangtek 51000HT) had a fairly in-tact capstan when it arrived. It originally had a translucent appearance with a very smooth finish. This would suggest it was some kind of synthetic compound, likely molded onto the brass spindle at the time of manufacture. If you have any knowledge about what these were originally made of, please leave a comment. Whatever it is, it was only good for a decade or two at most. Even the 51000HT’s apparently intact capstan turned to mush after a minute of operation. The capstans on older drives I received were completely gone.

Before you try to run up and old drive, it’s always worth checking if the capstan material is still attached to the spindle. If not, it’s likely somewhere else in the drive. Depending on how it was stored you might get lucky like the above, or, very unlucky and find it inside the motor, as was the case for one drive I bought off eBay.
Quick and dirty approach
I did quite a bit of experimentation to see if I could come up with a makeshift capstan which gives a reasonable amount of use from the drive. Eventually I came up with this:

The silicon tube is thermal interface material for TOP-3 transistors. It happens to be ideal as a final layer for a makeshift capstan. This approach above is cheap and easy to make, and works very well. It’s very important that the Kapton tape is wound on sticky-side up otherwise the silicon tube will not stay attached. It’s also important that Kapton tape is used – I tried an array of different tapes, everything else came apart in minutes. My approach was to wind one layer on sticky-side down, then reverse and do the rest sticky-side up.
Bear in mind that Wangtek capstans have a “step” – I start winding onto the thinner end first, then move the tape over when I’ve padded out the thin end to the same size as the large end.
I’ve had one of these running for several weeks now without issues. The only drawback seems to be that the drive will end up quite noisy as can be seen in my video. This is because it’s impossible to make the final capstan perfectly cylindrical.
Silicon rubber vacuum hose
If you happen to have the perfect type of hose kicking around – this is definitely worth a try. I went through all those hoses I had on hand, none were consistent enough or the right size. I wasn’t keen to go splashing out on a cornucopia of hoses trying to find the right one.

One thing to note about this approach is final capstan size. In the above image it is mentioned that a Wangtek drive has been restored. These drives, regardless of model do their tacho at the motor. If your final capstan size is not 15.7mm (12mm for Archive drives) the tape speed will be incorrect.
This isn’t likely to matter so much for retrieving data as the MFM encoding on the tape is tolerant to differences in speed (to a point). For a drive writing data, this matters. In this case I’d recommend a more proper solution.
Replacement services
One name that comes up repeatedly in this context is Terrys Rubber Rollers – for the price of $50-$70, he will apparently replace the material on the capstan. An easy option for sure, except if you’re outside of the US like me, this will cost a fortune, as the bare capstan has to be posted to him before it can be rebuilt and in addition to a considerable price for the service, international shipping plus duty has to be paid twice. Additionally – I have 6 tape drives wanting new capstans 😉
From looking at his website – his specialty is pinch roller capstans, which require a lot more precision than is strictly needed on a QIC capstan, as those do not come into physical contact with the tape, however, there is something to be said for having a very precise capstan on a QIC drive, because it will run a lot quieter.
Unfortunately at the time of writing, a statement on his website advises that his post office is advising him not to take any orders due to the COVID-19 pandemic. I would be less than happy to receive such advise myself. Needless to say I had to find another solution.
In this video a Wangtek 5099 can be seen with one of Terry’s rollers in action. It is very quiet!
Making some proper capstans
There are three measures of the quality of a QIC capstan:
- How long it lasts
- How well it grips the drive wheel on the tape
- How “cylindrical” it is. Uneven capstans will cause the drive to vibrate a lot
Since I have a mini lathe – I’ve decided to have a crack at machining some better capstans.
To ensure I end up with something that is grippy and robust – I’ve used rubber. I did try out some soft polyurethane however it was too “slippy”. I’ve tried a couple of types of rubber sheet (one natural, and another synthetic) and both worked OK.
First a blank plug is drilled out of this sheet of white rubber using a 22mm holesaw
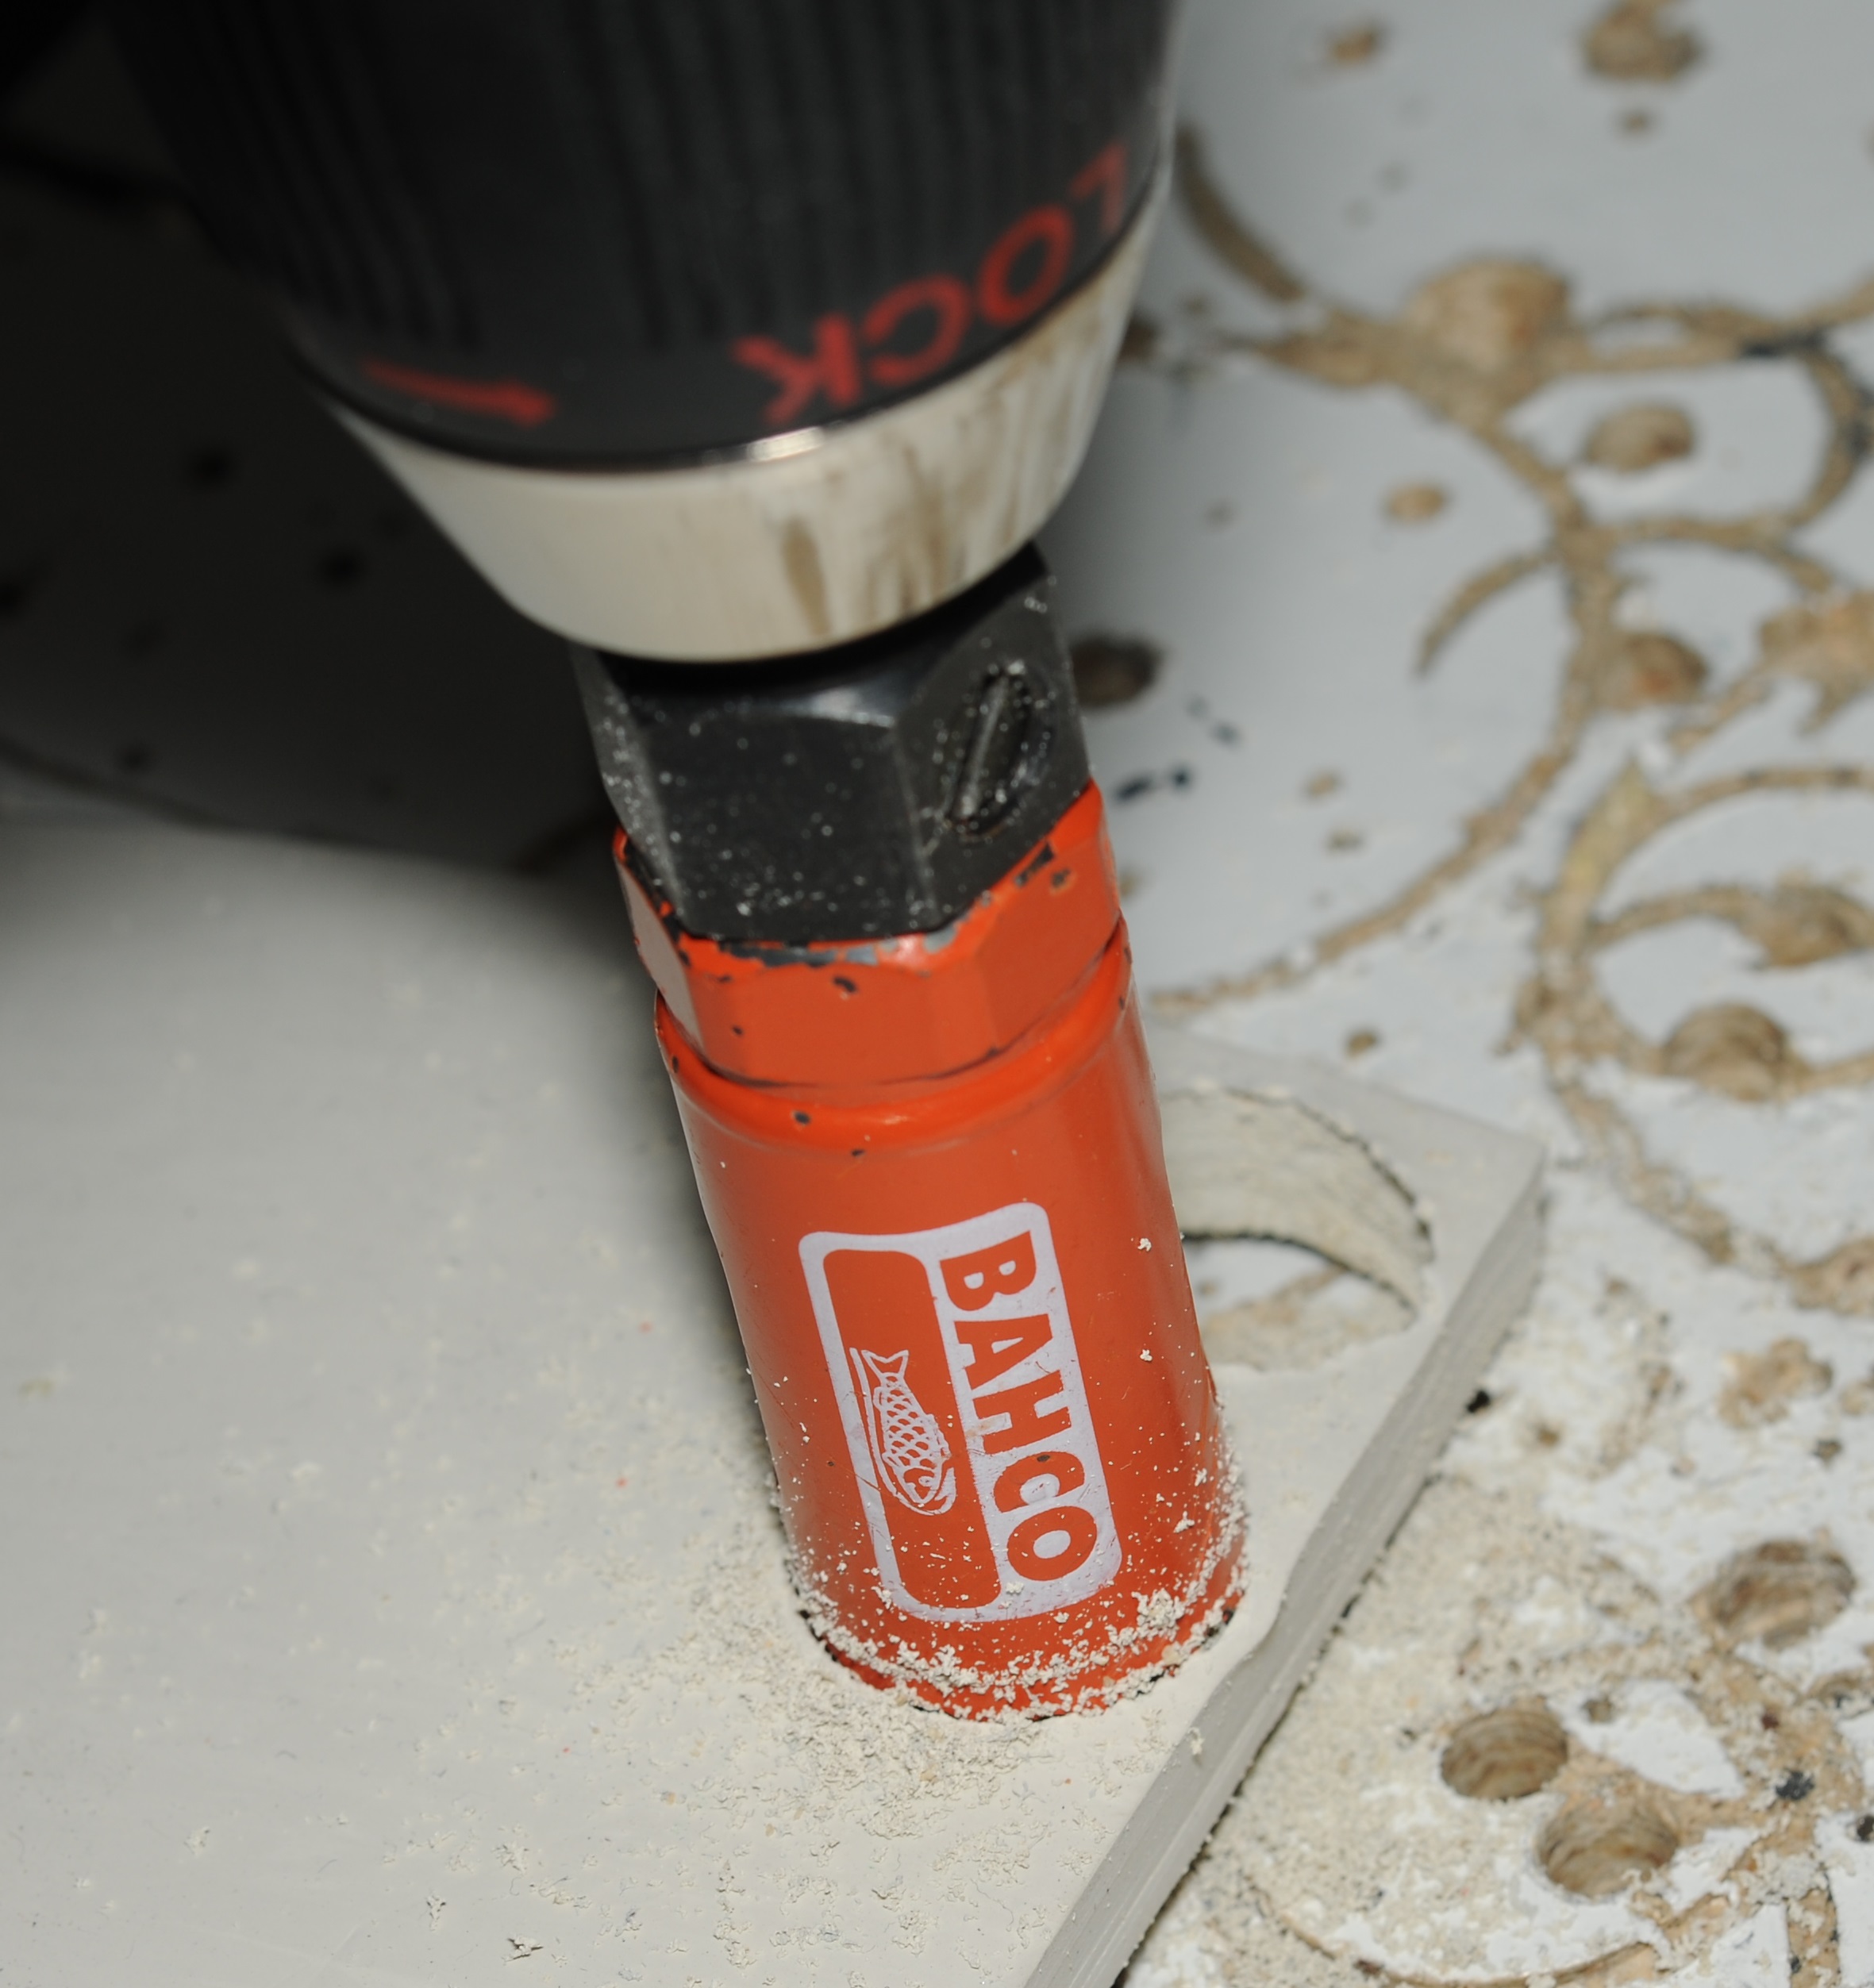
Now we have a messy plug from the inside of the holesaw
That plug is then stuffed into a mandrel which was specifically machined to take the plug from the holesaw

The hole in the centre is enlarged with a small boring bar.
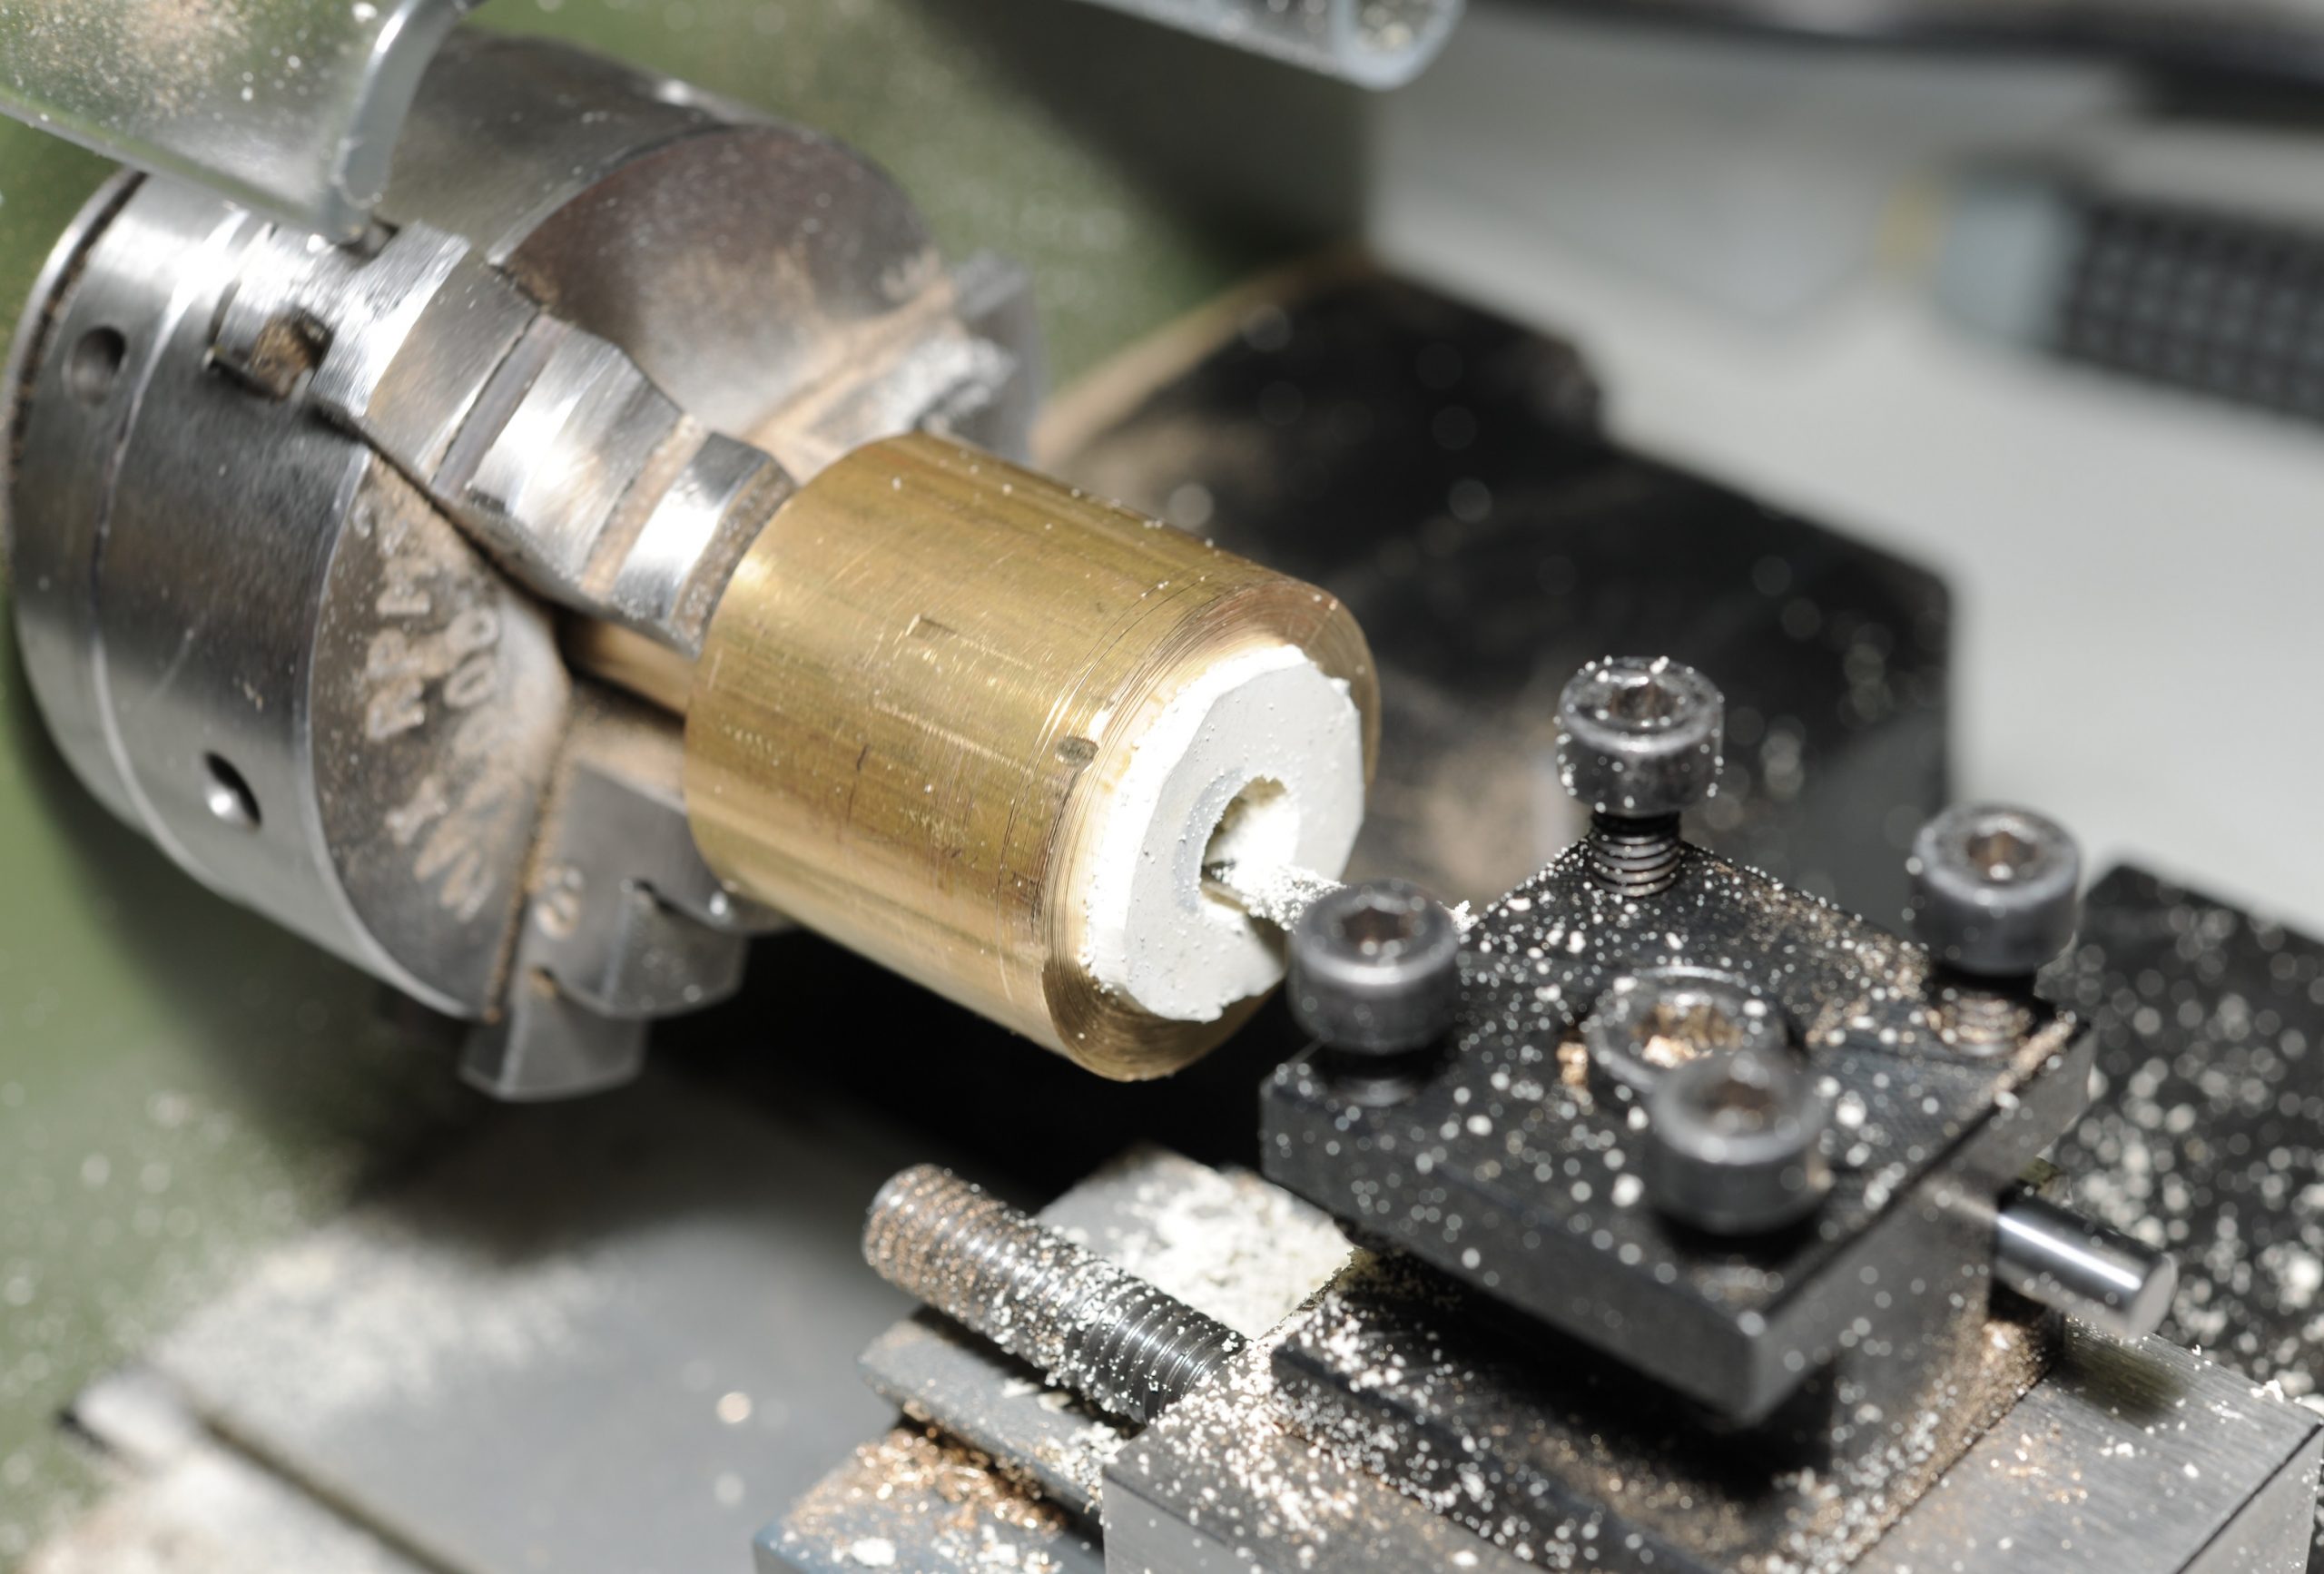
For a Wangtek capstan – there is a “step” on the brass spindle. I cut a little indent into the plug to accommodate this.
I had to machine up a couple of finishing mandrels, one for Wangtek capstans (top) and one for Archive capstans (bottom). These have the same profile as the metal spindle which the rubber tyre is to be fitted to.
in the case of a Wangtek drive it is possible to finish a capstan on the original brass spindle. In the case of an Archive drive this is a lot harder as it is not possible to grip the capstan in the jaw with any clearance left over to machine the top end of the rubber tyre.
Having the mandrels makes this a piece of cake. They are easy to mount and I can use them to size the rubber tyre with ease.

The final size of a Wangtek capstan is 15.7mm
The final size of an Archive capstan appears to be 12mm – which I have machined my mandrel to match. The tyre doesn’t go out to the edge of the pulley like Wangtek capstans.
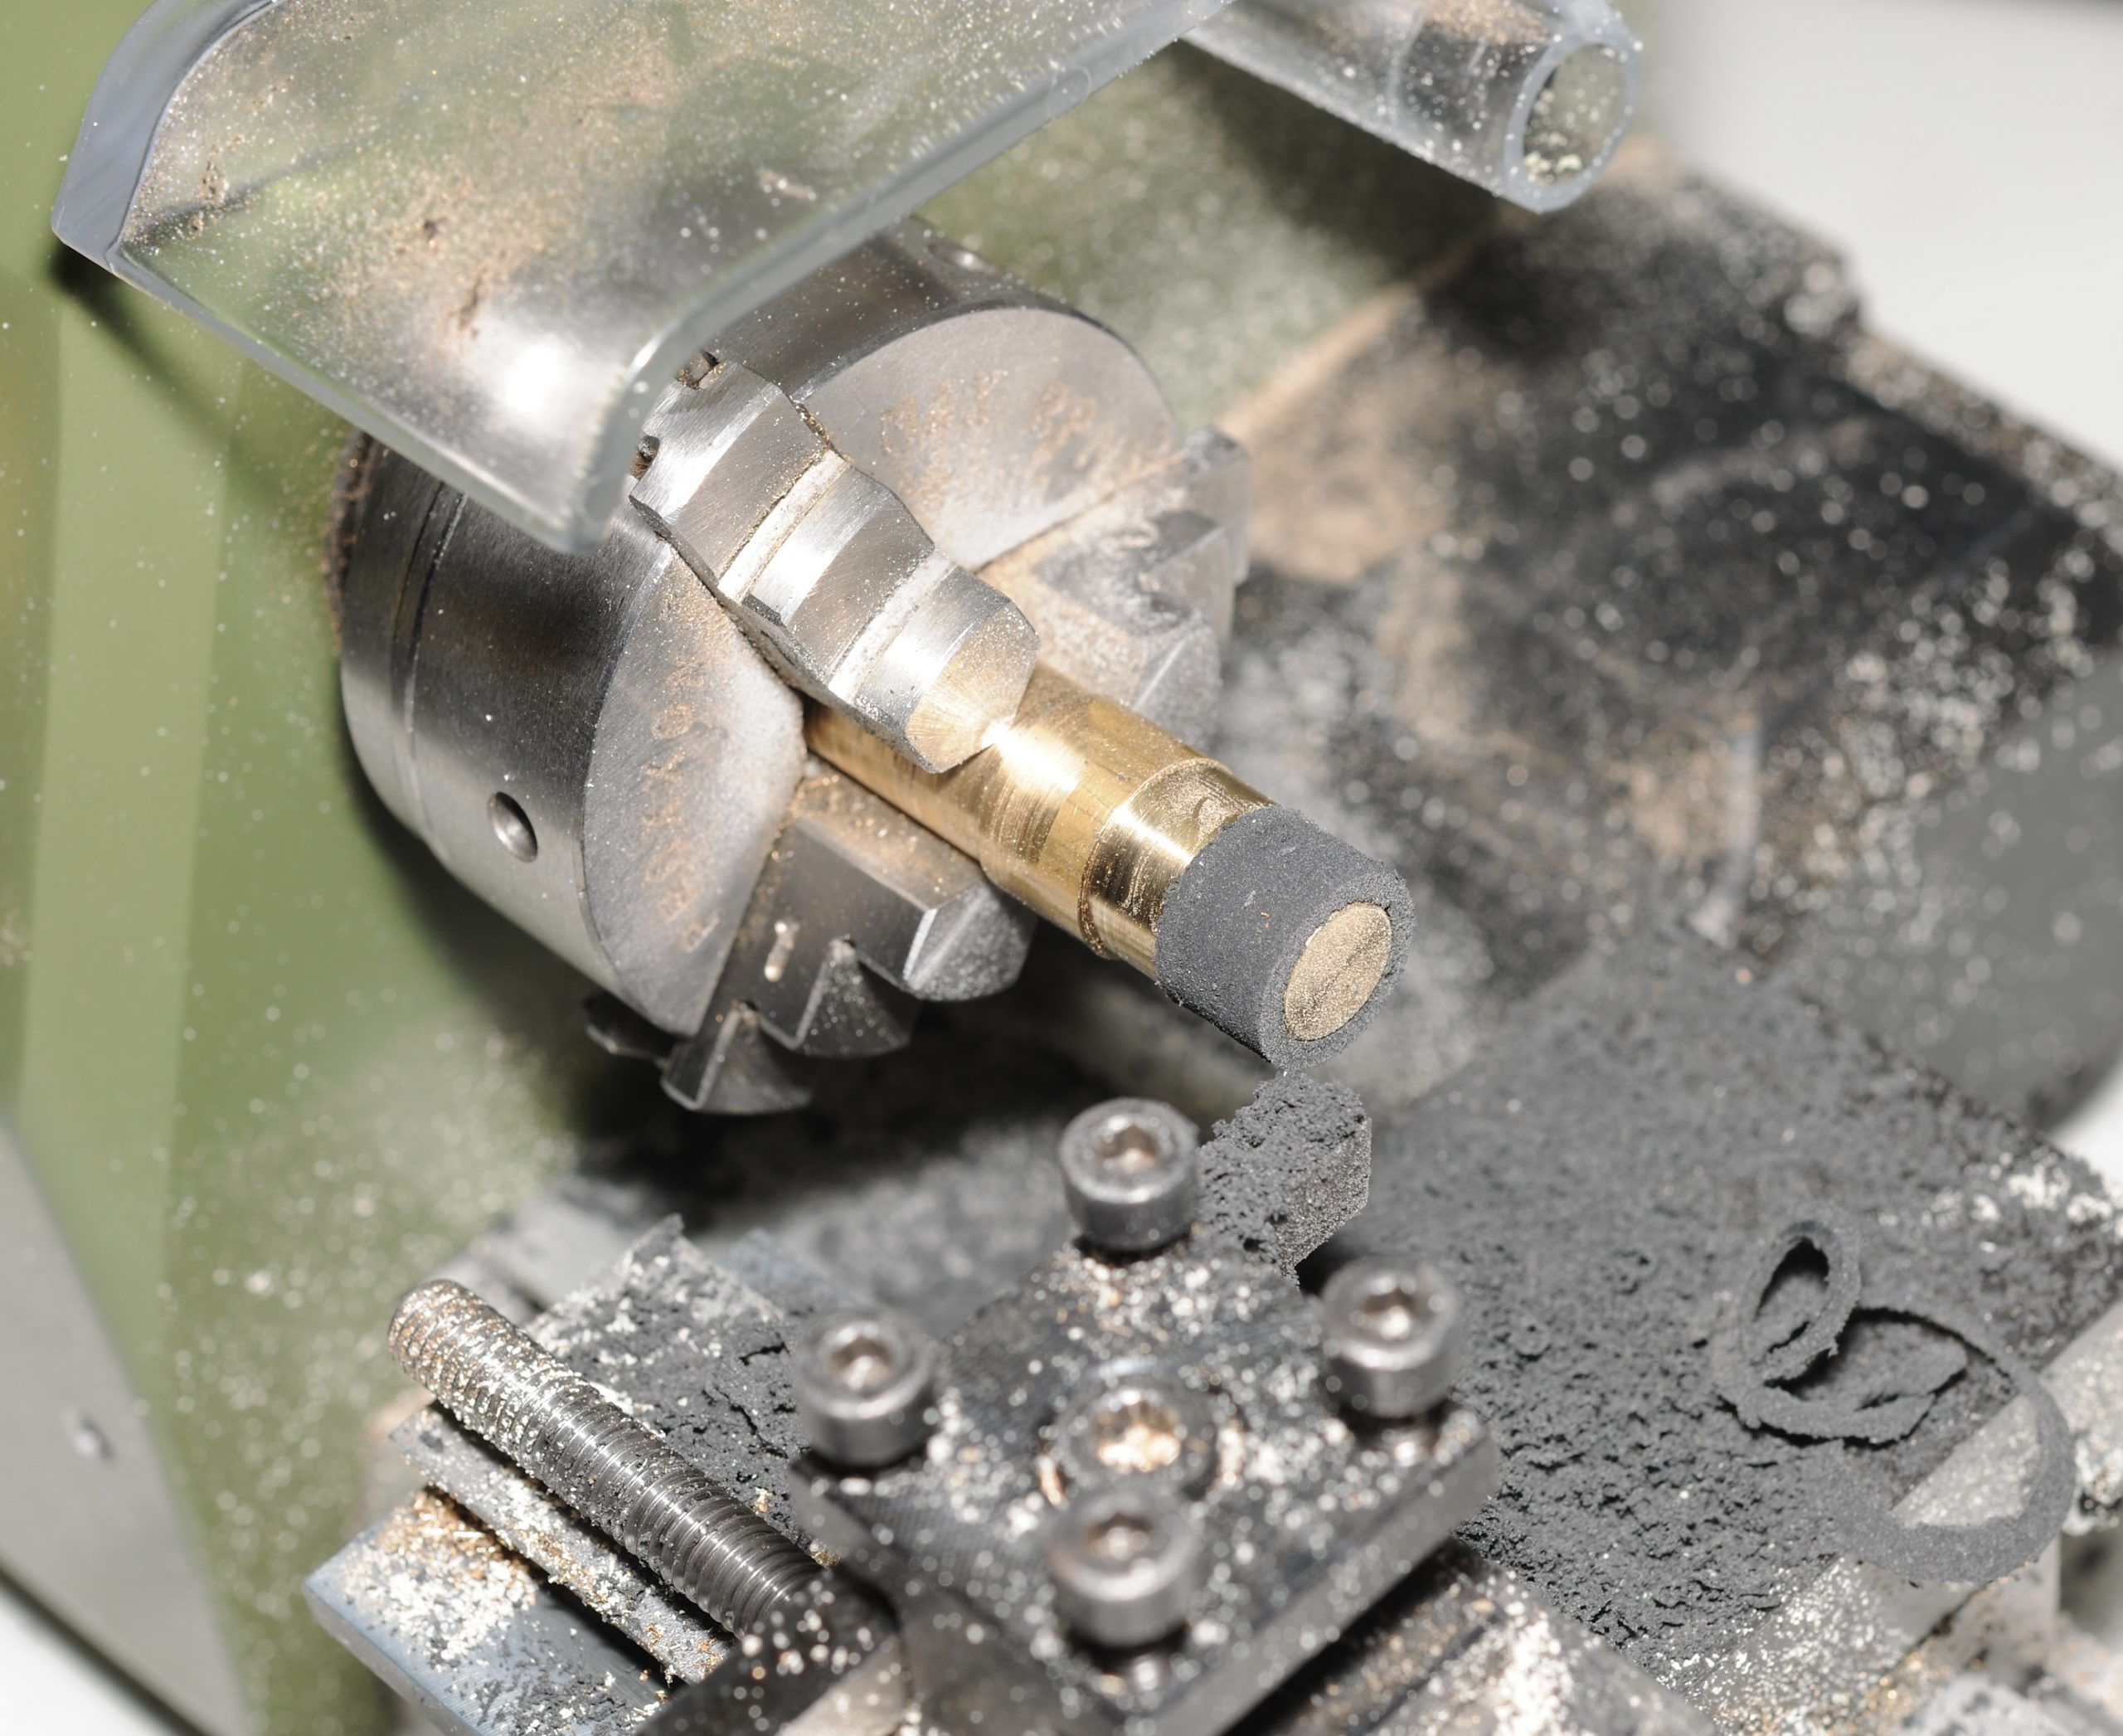
The plug is now fitted to the finishing mandrel

The plug is then machined down to its final shape:

The finished rubber tyre is then fitted to the brass spindle. I was surprised that no glue is required. I’ve not yet had one even threaten to inch its way off the spindle!

Centre: Wangtek capstan with soft white rubber
Right: Archive Viper capstan with hard black rubber
We’re done. And with a result not too much shabbier than that of the pro’s. I’m yet to decide which kind of rubber I prefer. Ideally I’d like a material which has the properties of rubber but machines easier and doesn’t blunt my cutting bits so quickly. The softer white rubber results in slightly quieter operation.
I now have only a tiny amount of vibration from unevenness, compared to my bodge solution mentioned earlier. For my slower drives (Wangtek 5099, 5150) the vibration is inaudible.
The Archive Viper capstan turned out the best – not having the “step” like on the Wangtek drives, it’s exceptionally easy machine a perfect tyre.

My proper capstan solution is very robust. I’ve had a couple of them in regular use for weeks now without any issues. It only took me about a day to machine up the needed parts to build these.
Recent Comments